How to Make a Family Tree Wall in 5 Easy Steps
Here’s how to make a family tree wall in 5 easy steps even if you’re not crafty.

When the wall speaks, you listen
I walked into the house and put the grocery bags on the kitchen counter. I could hear the kids and my husband playing in another room across the house. As I went to check on them, I walked through the living room taking in the sunlight streaming from the wall of windows to my left.
I had a like-dislike relationship with our living room. I loved the wall of floor to almost-ceiling windows, and the beautiful backyard it displayed.
But then there was the other wall. It was staring down on me, as if to say, “So I’m the black sheep, huh? Every other wall in this house has long been decorated with artwork and metalwork, and frames of all sorts. Every one of them, except for me.”
The wall was right. I didn’t know what to do with it. It was in the shape of an irregular hexagon, and even though there were right angles everywhere, it just seemed to be off-balance.
None of my ideas fit that wall well. I stared at it. The wall had more arguments to share, and I stood there, taking it in.
After a little while, it was decided. The wall has convinced me that it’s not fair that she’s the only naked one in the whole house, something needed to be done. I promised to figure something out and went on to check on the people of the house.
I thought about putting a family tree with picture frames on my poor lonely wall, but the biggest tree I found was too small for my oversized, underdressed, pouty wall.
But then I had an idea
While looking at vinyl tree decals online, I noticed that most came in a package of detached limbs, and when you get the tree, you arrange them on the wall yourself, changing the shape as you wish.
“Brilliant!” I thought and ordered three identical tree decals. I bought some frames and the “Family” decal for the top of the tree and went to work.
Using all three trees, I combined the tree limbs, picture frames, and leaves to make one custom-sized DIY tree for our odd wall. This post contains affiliate links. This means if you make a purchase after clicking a link, I will earn a small commission, but it won’t cost you a penny more. Click here to read my full disclosure policy.
Here’s how to make a family tree wall in five easy steps
Step 1: Get supplies. Here’s where you can find the vinyl decal tree, the “Family” decal, and the picture frames. If you’d rather get a feel for the frames before you buy them, you can check your local craft store, they usually have a great selection of frames. I got my frames in Michael’s. Depending on the size of your wall, you may need more or less than the three trees I used.
Step 2: Begin arranging the tree, starting with the tree trunk. Place the tree trunk at the approximate center. It doesn’t have to be perfect, make it look natural. Then add the branches, overlapping the ends for a natural look. You can’t go wrong here, as long as you follow the natural flow of the tree with branches going upward and outward. Do not add the leaves and leave space for the “Family” decal. Reposition the branches as needed until you’re happy with the overall shape of the tree. The nice thing about wall decals is they can be repositioned easily, and won’t leave a sticky residue behind. Have scissors nearby to quickly shorten a long branch, or correct the shape of one or both ends of a tree limb.
Step 3: When the branches are formed and you’re satisfied with the skeleton of your work of art, place the “Family” decal in the space you left for it in an earlier step. It’s your tree to do with as you wish, so you can omit it altogether, or add birds around the tree instead.
Step 4: Hang the frames. For the perfectionists out there (like me), don’t overthink this. You don’t have to measure the wall for exact placement of the frames. The approximate location is fine, the tree in the background will balance out any asymmetries. I like the frames with matting. It accentuates the photo inside and just gives it a more wholesome look.
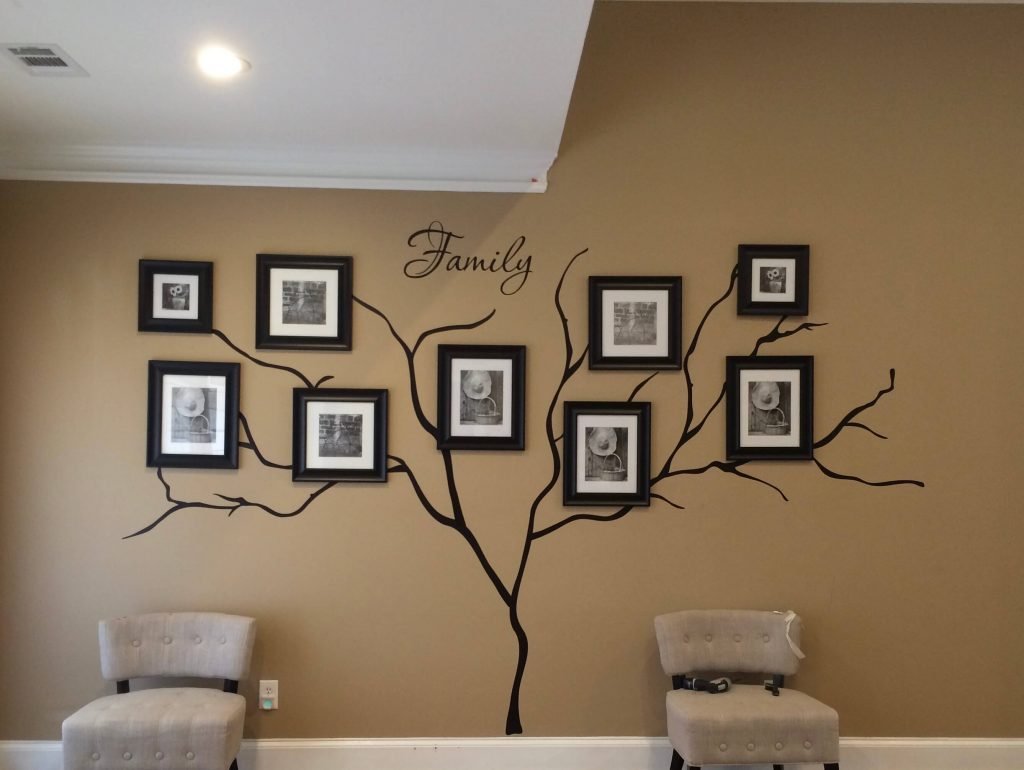 Step 5: Fill up the rest of the mural with smaller branches if needed and add the leaves on all exposed branches. I went with the “floating” leaves look where the leaves aren’t touching the branches, but rather float above and below.

Notice there aren’t any leaf tips peeking out from behind the frames. I left this part for last on purpose, to get the most out of the leaves. No leaves are lost behind the picture frames, which makes the tree look fuller.
And now, fill those frames with pictures of your loved ones, and enjoy!
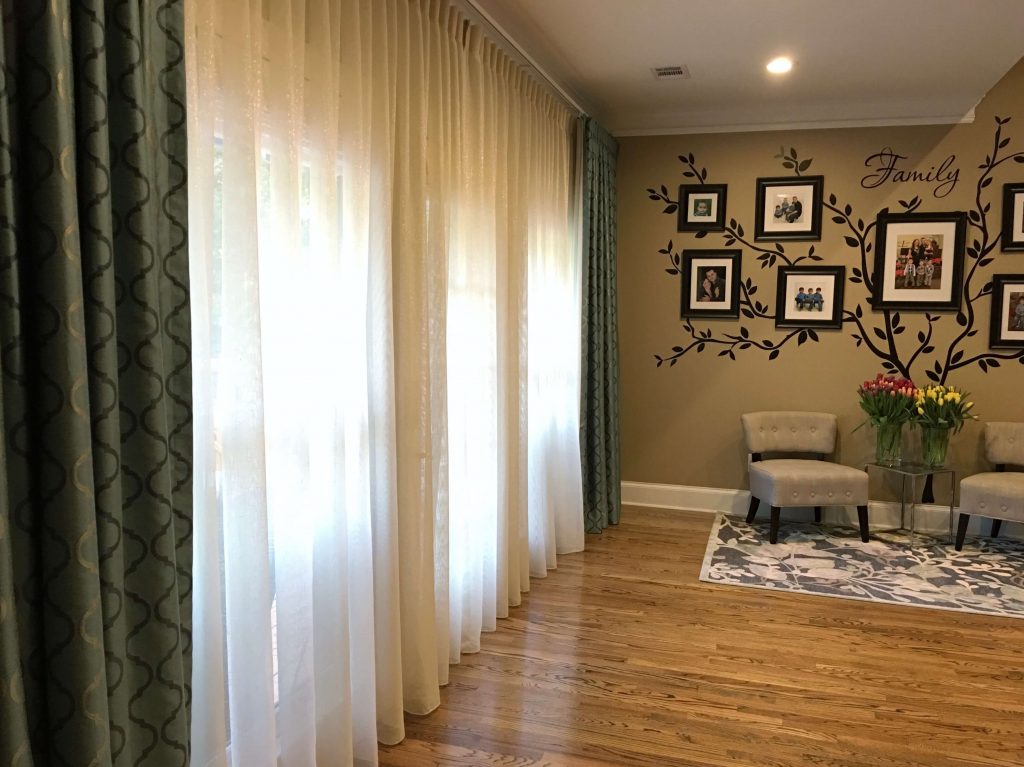
The family tree fits our home well. We love the wall, our visitors love the wall, and the wall loves the fact that she’s no longer naked.
On the other hand, updating the picture frames with current photos is a whole different story. Do you have any idea how hard it is to have seven people (most of them wiggly) look at one camera at the same time, with a somewhat normal look on their faces?